

DataGridView Kullanımı
Merhaba arkadaşlar bu makalemizde DataGridView kullanımı ile ilgili bir örnek uygulama yapacağız ve ve nesnenin özelliklerine bakacağız.
Screenshot

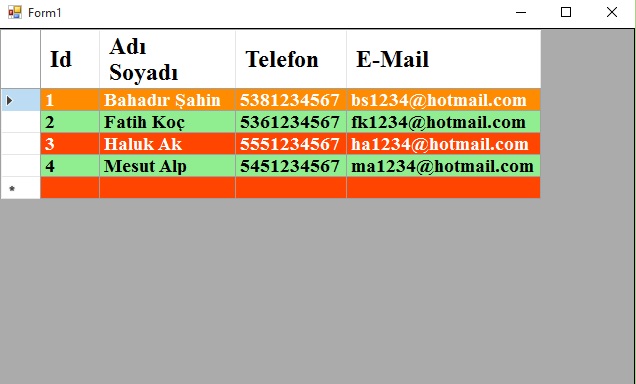
Şekil 1

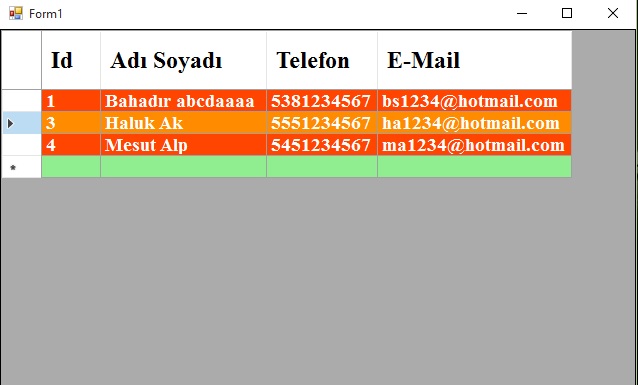
Şekil 2
Form1.cs
using System;
using System.Collections.Generic;
using System.ComponentModel;
using System.Data;
using System.Drawing;
using System.Linq;
using System.Text;
using System.Threading.Tasks;
using System.Windows.Forms;
namespace WindowsFormsApplication1
{
public partial class Form1 : Form
{
private System.Windows.Forms.DataGrid dataGrid1;
public Form1()
{
InitializeComponent();
}
private void Form1_Load(object sender, EventArgs e)
{
//Kullanıcıya yeni kayıt ekleme izni verilmesi.
dataGridView1.AllowUserToAddRows = true;
//Kullanıcıya kayıt silme izni verilmesi.
dataGridView1.AllowUserToDeleteRows = true;
//Veriye tıklandığında satır seçimi sağlama yapıyoruz..
dataGridView1.SelectionMode = DataGridViewSelectionMode.FullRowSelect;
//DataGridView sütun oluşturma işlemini yapıyoruz.
dataGridView1.ColumnCount =4;
dataGridView1.Columns[0].Name = "Id";
dataGridView1.Columns[1].Name = "Adı Soyadı";
dataGridView1.Columns[2].Name = "Telefon";
dataGridView1.Columns[3].Name = "E-Mail";
//DataGridView satır ekleme işlemini gerçekleştiriyoruz.
string[] row = new string[] { "1", "Bahadır Şahin", "5381234567","bs1234@hotmail.com" };
dataGridView1.Rows.Add(row);
row = new string[] { "2", "Fatih Koç", "5361234567", "fk1234@hotmail.com" };
dataGridView1.Rows.Add(row);
row = new string[] { "3", "Haluk Ak", "5551234567", "ha1234@hotmail.com" };
dataGridView1.Rows.Add(row);
row = new string[] { "4", "Mesut Alp", "5451234567", "ma1234@hotmail.com" };
dataGridView1.Rows.Add(row);
//Satır rengini değiştiriyoruz.
dataGridView1.RowsDefaultCellStyle.BackColor = Color.OrangeRed;
//Satır yazı rengini değiştiriyoruz.
dataGridView1.RowsDefaultCellStyle.ForeColor = Color.White;
//Alternatif satır arka plan rengini değiştiriyoruz.
dataGridView1.AlternatingRowsDefaultCellStyle.BackColor = Color.LightGreen;
//Satır yazı rengini değiştiriyoruz.
dataGridView1.AlternatingRowsDefaultCellStyle.ForeColor = Color.Black;
// Sutun arka plan ve yazı rengini belirliyoruz.
dataGridView1.Columns["ID"].DefaultCellStyle.Font = new System.Drawing.Font("Times New Roman", 14, FontStyle.Bold);
dataGridView1.Columns["Adı Soyadı"].DefaultCellStyle.Font = new System.Drawing.Font("Times New Roman", 14, FontStyle.Bold);
dataGridView1.Columns["Telefon"].DefaultCellStyle.Font = new System.Drawing.Font("Times New Roman", 14, FontStyle.Bold);
dataGridView1.Columns["E-Mail"].DefaultCellStyle.Font = new System.Drawing.Font("Times New Roman", 14, FontStyle.Bold);
//Kolon başlıklarının yazı tipi,fontu ve font stilini belirler.
dataGridView1.ColumnHeadersDefaultCellStyle.Font = new System.Drawing.Font("Times New Roman", 18, FontStyle.Bold);
//Seçili olan hücreler için arka plan rengi ve yazı rengini ayarlar.
dataGridView1.DefaultCellStyle.SelectionBackColor = Color.DarkOrange;
dataGridView1.DefaultCellStyle.SelectionForeColor = Color.White;
//Herhangi bir sütunun genişliğini o sütunda yer alan en uzun değere göre ayarlanır.
dataGridView1.AutoSizeColumnsMode = DataGridViewAutoSizeColumnsMode.AllCells;
//Kullanıcı,sütun başlığının üzerine geldiğinde bu açıklamanın görünmesini sağlar
dataGridView1.Columns["Adı Soyadı"].ToolTipText = "Personelin tam adı girilmiştir";
}
}
}
Bir makalenin daha sonuna geldik. Bir sonraki makalede görüşmek üzere. Bahadır ŞAHİN